

My very first tutorial! SCROLL down to see it. Bare with me, I'm a newbie ;)
Ok, so as some of you know we did the room switch up. The bunk beds moved entirely to my 10 year old daughters room. Perfect for sleep overs which are the theme these days. This left the little Bean without a bed. She of course wanted a bunk bed just like her sisters, but I didn't want to spend that kind of money nor do I think it is the safest bet for a four year old. Trying to figure a way to get her super excited about her new room I started looking at loft beds. I saw images like this: (a little over the top if you ask me.)


Well, I went looking and found a very simple loft bed at WALMART. Yes, Walmart. Solid wood, on sale for under $200 bucks. {compared to the $500-$700 beds I saw, I thought this was a deal} Especially since this bed, the actual bed part looks almost JUST like these, and it was easy enough to put together and a solid piece.
What I liked about these beds were the little play lofts underneath too. Perfect for the way my Bean plays.

So Blah, Blah, Blah. Sorry about that. Onto the tutorial.
Here is how to make the play fort part:
you will need 3-4 yards of fabric:
1 yard of fabric for the footboard and 1 yard of fabric for the headboard (my headboard is up against a wall so I decided to skip that panel.)
& 2 One yard panels for the each of the sides of the bed (once again, one side of my bed is up against a wall so I skipped those panels too.)
& a tension rod

Step 1: Take one of your yards to make the footboard panel. Find the center.
{You could be super easy and just sew up all sides leaving space to push through your tension rod. BUT I wanted a window for her fort.}
NOTE: if you really don't think you can sew, they have no sew tape at your fabric store and You could do this entire project without sewing a stitch. ;)

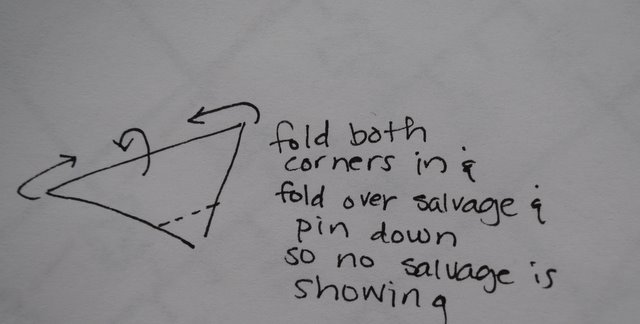
STEP 2: once you find the center, take a ruler and a pencil and mark a 12x12 inch square. Then mark corner to corner creating an x. Snip the center of the x and then cut down all the lines. It will end up looking like this:

OK, at this point you could use BIAS TAPE. AND you could THEN SKIP TO STEP 8
I didn't because:
1) I hate that stuff.
2) I didn't have any and I was trying to be FRUGAL.
Step 3: cut off the triangles making a straight edge on all the flaps. Set the triangles aside to use later.

Step 4: press under and pin down all four edges and then stitch them up sewing all the way around the square. you will notice that there are unfinished seams in each corner.

Step 5: fold the left over triangles, wrong sides together and stitch up one side. Turn right side out (I like using my handy chop stick to make it all the way out.) press.
Step 6: now take the finished corner of your triangle and pin it to the outside corner of the window. You are going to stitch a diagonal line from the windows stitching to the windows stitching. (I forgot to take a picture, but the end result is going to look like this)

Step 7:
once all four corners are pinned down sew with the wrong side facing you so you can adjust accordingly. You are going to sew a second line around your window to sew these pieces down.

Step 8: fold over and press the sides and bottom of your panel. For the top, fold over and then pin leaving enough room for your tension rod.

Step 9:
Yeah! Now you get to cut out your window curtain.
and tie strips. You are going to cut out one long piece 30x14 for the curtain and two pieces 30x3 for the curtain strips.

Step 10: fold the curtain piece in half wrong sides together.
Sew the curtain wrong sides together leaving an opening to turn it right side out.
Turn right side out. Press and then top stitch all the way across the side that was left opened
Step 11:
Fold one of the 30x3 strips in half and press. Now unfold and use that line to fold each side down into.

now fold over, leaving raw edges in the middle. Press and pin. Sew up both sides of the strip.
Step 12:
Do the exact same thing with the second 30x3 strip. Now cut each strip in half. You will now have 4 strips.
Fold over and stitch all of the little ends of these strips.

Step 13:
Ok, so now pin the window curtain to the front of your window panel. Center it and pin it to the front. (I then flipped it to the back carefully and pinned the 2 strips evenly to the back side top of the window panel.)
Then stitch across the top to attach both the curtain and the back ties all at once.

Step 14: (you are almost there!)
the last step is to pin the other 2 ties to the front side of the window curtain. Fold the curtain up a little to line up where they need to be pinned. They should be in the same spot on the front as they are on the back. Stitch across.

You just finished the hardest part of this project.

TA- DA!
The sides are going to be panels with simple tye backs.
I am going to post instructions for the sides and the final finished product on Monday.
{I didn't have enough fabric and it should arrive today or tomorrow. I also need to figure out IF they have tension rods as big as the sides of the bed.}
Happy weekend!
Hey, just found your charming blog. I'm your newest follower. You Etsy shop is adorable as well. I heart all the bags. You are very creative! Cheers
ReplyDeleteHow fun! It looks great!
ReplyDeleteI'm a new follower! =0)